Hey Beauties!!!
Long time no see... Now let me explain why...
I think the last time I posted was maybe 3 years ago?!!
I've had a lot going within the past few years. The internet can be a cruel and evil place, which I came to learn the hard way. Looking back, I shouldn't have let cyber bullying affect me so much...but I did. At the end of the day, these people have too much time on their hands and use the computer screen as a "safety barrier" to be able to spread their negativity without any repercussions. I decided to lay a low profile, getting rid of all forms of social media and focus more on the real world and you know what folks...it worked wonders.
This may come as a bit of a surprise but I graduated with a Masters in Chemistry, so as well as beauty, science has a hold on my heart too <3. For some graduation day makeup inspiration click the link.
I started working, and let's just say blogging was put on the back burner. It was really difficult to find a work-life balance and get your priorities straight.
Two more years down the line and I moved to Scotland!!! I got married (Alhamdulillah) and moved to Scotland with the hubby, because traditionally the bride relocates to be with the groom plus it made sense as I was a lot more flexible.
Now I'm settling into my new home, still doing it up (only managed to get the pantry sorted yesterday) and have started working again. I thought to myself "Wonder what happened to the blog I used to spend a lot of my free time writing in?" and Lo and Behold here I am writing this update.
I've got so many post ideas - granted some of them will not be related to beauty but I feel like mixing it up.
Hope you're all having a brilliant summer (click for summer tips) and watch this space for more posts.
You don’t always need a plan.Sometimes you just need to breathe, trust, let go and see what happens.
– Mandy Hale

Wednesday, 27 July 2016
Monday, 6 May 2013
Summer is near
Hello beauties!!
It has been such a hectic past few months, so I thought I would make good use of this May bank holiday to do some posting. I last blogged 3 months ago, so I think its well over due!!!
So, it's that time of the year again.... "Hair gets lighter. Skin gets darker. Water gets warmer. Drinks get colder. Music gets louder. Nights get longer. Life gets better."
Summertime!
However, with all the fun and games in the sun, summer can have some long term damaging effects.
To begin with the most obvious, protect your skin from the sun. Harmful UVA and UVB rays will most definitely age you over time, and not to forget, making you more susceptible to the "C" word. Even if its cloudy, protect your skin by using a sunscreen with an SPF of 30 or above. Now when it comes to vanity, the greasy look does not work for me, that's why I love La Roche-Posay's Anthelios range. It gives me the protection I need without looking greasy on my skin. Don't forget your hands, they will definitely show your age if you aren't careful.

You may think that now that summer is here, exfoliation isn't necessary, especially if dry skin tends to occur mainly during winter. However, when the climate gets hotter, so do you, unless you're one of those rare humans that do not sweat (believe me I know a few and I'm very jealous). If there are dead skin cells lying around, they block your pores, and so sweat can not escape easily and your skin will get irritated, causing unsightly sun spots. Stick to exfoliating at least once a week. I'm loving The Body Shop's Vitamin C microdermabrasion cream. Or for something more gentle, St Ives do a microdermabrasion face wash that is gentle enough for every day use. For the body, you can't go wrong with LUSH scrubs, wether its Scrub Scrub Scrub, or LUSH's sugar scrub. Want to know how to make your own sugar scrub? Visit my earlier blog post for the recipe.
As well as looking after yourself from the outside, try to hydrate yourself from the inside. Increase your intake of water, as the heat will dehydrate you and your skin.
Summer is all about ditching the heavy make up and looking fresh faced. Allow the foundation, and try a tinted moisturiser, tinted lip balm and rosy cheeks. Bronzer is your best friend this time of year, so utilise it. A prime example is Miranda Kerr. This fresh faced beauty exemplifies summer beauty.

Hope you all have a pleasant bank holiday, and with another day off at the end of the month, summer is just that little bit more pleasant.
“Everything has beauty, but not everyone sees it.” Confucius
Sunday, 27 January 2013
Back to Basics: Hair growth tips
This post is dedicated to all the folks that cut their hair significantly short, and are trying to grow it back. I am talking from experience! So here are some best tips for faster hair growth.


Diet
Eat a balanced amount of protein daily
Hair is mainly composed of keratin, a protein made from amino acids. By consuming protein, you are providing your body with the "building blocks" for your hair. Healthy protein sources include lean meat, fish, eggs, nuts, beans and soy products.

Don't completely cut out fat
By fat, I mean unsaturated fats and fatty acids such as omega 3. These fats are important for as they help your body to process essential vitamins needed for hair growth such as vitamin A, D, E and K.
Vitamins
As well as the vitamins outlined above, Vitamin C is also responsible for hair growth. Vitamin C deficiency can cause dry, dull and weak hair that is prone to breakage. Vitamin C is used to make collagen, a fiber that is essential for the production of new hair cells. As well as citrus fruits, Vitamin C can be found in strawberries, broccoli, guava and peppers.
Iron and Zinc
Iron is also found in the above mentioned protein sources, and is essential for hair growth, as it supports your red blood cells to provide oxygen to your cells, including your hair follicles.
Zinc helps with growth and repair of your hair, and also keeps the oil glands around your hair follicles working as they should. Zinc can be found in peanut butter, oysters, crab, poultry, pumpkin seeds and chickpeas.
If you have a Zinc or an Iron deficiency, you may need health supplements. Seek advise from a health professional before taking any steps.
Psychological
Promote growth by minimising stress
Easier said than done, I know! But simple things like eating well, exercising regularly and getting enough sleep can help to reduce general physical stress levels. Intense stress or emotional stress can cause hair growth to slow down or even stop. Hair loss can be found in sever cases.
By learning how to effectively manage emotional stress, you are doing yourself as well as your hair a favour. Removing emotional and psychological can help give your body the environment it needs to produce health and rapid hair growth.

Health
Medical condition
It is possible that your hair growth rate can be affected by a medical problem. Prolonged illnesses, eating disorders, prescription medication, genetic or family history can be an underlying problem. Consult a physician before beginning any hair growth regimes. It could be that targeting an underlying medical condition is all you need to restore your hair growth rate.
Hormonal imbalances can also affect hair growth. Balancing hormonal changes due to menopause, change in birth control use, thyroid or testosterone levels can restore hair growth.
Styling
Avoid
- Excessive combing or brushing - this will cause premature hair fall out
- Chemicals - perming, bleaching, chemical straightening and repeatedly colouring hair
- Rubber bands - these will cause hair to break, use gentle hair bands that do not contain any metal binds.
- Excessive washing - it is recommended to wash your hair up to 4 times a week. No more! This will avoid the natural oils being stripped away.

Do
- Follow proper hair hygiene and choose products carefully.
- Use oils such as coconut, almond and olive oil on your hair.
- Trim your hair every 6-10 weeks - this won't promote hair growth but will avoid split ends travelling up the hair.
Be Patient
Even by doing everything outlined in this post, it will take about 6 months before any change can be seen. As well as doing good for your hair, you are benefitting your health and general well being by following these guidelines.
I hope this advice helped, I know I'm eager to have long hair again.
Stay blessed, Peace!
Thursday, 24 January 2013
Review: Diorshow Blackout Mascara
We all hear about certain products in the beauty market, and wonder whether its worth purchasing, especially with products that are difficult to try out.
I had the same dilemma with my recent buy - Diorshow blackout mascara by Dior. I've always owned drugstore branded mascara's, but after hearing raving reviews about this particular mascara, I thought its about time I invested in this bad boy!

So looking at the packaging, its a nice sleek design, with your Dior stamped logo printed all around.
Dior has many types of mascaras. I chose Diorshow Blackout because it contains Kohl, so that the mascara is very pigmented, and because of the brush.
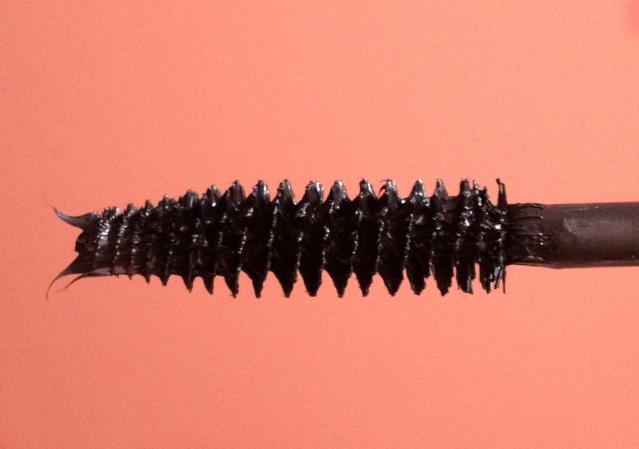
As you can see. The brush is like your classic mascara brush. I was pleasantly surprised with the size of the brush. For my lashes (thin and fairly long) this is great for adding volume and length, as the larger bristles "snuggle" my lashes.
However, for my lashes I would have preferred a drier formulation. Its not too wet, and not too dry. The wetter the formulation, the heavier the mascara, and your lashes are weighed down. If you have thin lashes like me, I would advise you to curl your lashes before applying the mascara. This product is really good at holding a curl.
What I love about this mascara, is that I can wear it alone without any eyeliner to intensify my lash line.
Diorshow Blackout is priced at approx. £23.00 in the UK. It certainly is a luxury price to pay for mascara, especially if you don't use mascara often. It is advised that mascaras (once opened) should be used for 6 months. This is to avoid eye infections and the mascara drying up.
I hope this review was helpful and there will be plenty more where this came from! Stay blessed, peace!!
Tuesday, 18 December 2012
Tis the season to get smokey
Xmas is drawing near, and I am sure most of you have attended at least one Xmas party. One of my most favourite and glamorous looks for parties are smokey eyes (followed closely by the 'Red Lip' look.)


There is just something so glamorous and alluring about a smokey eye. It can be played down with neutral colours or you can go all out wearing bold eyes and lips, the choice is yours.
I treated myself to some retail therapy a few days ago, and was kindly given some complimentary makeup, courtesy of No.7 at Boots.

As soon as I opened the 'Deco Darling' gift box, I knew these products were perfect for a smokey eye look. I thought I would share how you can make good use of these products too.
The kit contained:
- Exceptional Definition Mascara in "Black"
- Stay Perfect Lipstick in "Classic Rose"
- Stay Perfect Eyeshadow in "Black Gold"
- Stay Perfect Metallic Eyes Pencil in "Blackest"


Get The Look
Unfortunately, the box did not contain a foundation base, so I had to provide my own.
- I started by prepping my skin with a moisturiser and a primer. I used 'The Body Shop's Seaweed mattifying day cream' and 'Collection 2000 Primed and Ready' primer.
- I applied my foundation on all the necessary areas with a foundation brush. Matte skin is best for this look, so I used 'Chanel Perfection Lumiere in 50 Beige'
- I started on the eyes by applying the metallic eyes pencil along my top lash line. I made a very thick line from the inner corners to the outer corner.
- Then I took a blending brush and used the Stay Perfect eyeshadow to blend the eyeliner. I started on the outer corner of the eyes and blended inwards to get the gradient effect. You can build the colour however much you want.
- I applied the Metallic Eyes liner again, this time concentrating on keeping the line closer to the lash line (upper and lower lash line.) I used the blending brush to blend the liner again, but this time I didn't use the eyeshadow.
- Finish the look by applying two coats of the Intense Volume Mascara. Let the first coat dry before you apply the second coat. You can also opt to use false lashes to add drama.
- I wiped away any fallout under the eye, then used concealer to brighten the under eye.
- Contouring is a must for this look, especially if you are planning on taking pictures. You want to avoid a flat face. I used 'Victoria Jackson bronzing powder' to contour my cheeks. You may use a peach or light pink blush to add colour to your face.
- Last but not least apply the Stay Perfect Lipstick onto your lips. Blot your lips with tissue and reapply for a longer wear.

I have quite a hooded lid, so I didn't take the colour beyond the crease. However you can adapt the look to suit you. If you feel scared to put the colour all over the lid, you can smoke out the liner without apply the eyeshadow all over the lid.
Hope you like the look, and Good Luck!!
Stay blessed, Peace!
"Makeup is for now, but beauty is forever"
Friday, 7 December 2012
Back to Basics - Makeup to suit your eye shape
I have received a request to write a post on how to create eye makeup to suit your eye shape. So here it is. What I love about makeup is that you can use colours and textures it to manipulate all sorts of looks and shapes. Eyes can be enlarged, made smaller, emphasised or defined just by makeup. All you need to do is know how.


There are 6 main types of eye shapes. I will talk about how to "correct" each eye shape with makeup. To be honest I don't like using the word correcting, but I mean generally if you want to know how to apply makeup in a way to suit them then keep reading.
Almond eyes
This eye shape is considered to be the "perfect" eye shape, as most styles of makeup will suit this eye shape. Go crazy and experiment with different colours and styles of shading and highlighting.

Down turned eyes
This is where the outer corner of the eyes droop down slightly, almost giving the eyes a sad look. A technique to "lift" the eyes is by shading up and out, almost drawing yourself a lifted eye. You want to apply liner close to the lash line and you want to fill the outer 2/3 of your eye socket with a dark shade. This will lift the eye. Curl your lashes and apply mascara to really open them up.

Prominent eyes
Also known as bulging eyes, you would think that by adding very dark colours you are receding you eyes. Incorrect!! By going to dark with eyeshadow, its going to look obvious. Its actually best to stick with neutrals and nude colours. If you want to use bright colours then apply it on the lower lash line to add a pop of colour. This also helps to shift the focus away from the lids. Another tip is to use false lashes rather than eyeliner, as that will set the eye back a little.


As you probably have guessed, doing the reverse for what is advised for closed set eyes is appropriate for wide set eyes. To bring eyes closer together, you should emphasize the inner corners by using darker colors in the inner corners. Apply lighter eyeshadow to the outer two-thirds of the lid. You can use eyeliner on both the top and the bottom lashline. Pencil eyebrows a little closer to the nose but don't extend eyebrows out at the ends. 
Closed set eyes
The key thing to do here is to highlight the inner corners and shade only the outer corners (1/3 of the eye). You want to make the gap between your eyes look bigger, and you want to take the emphasis off the shorter distance. Please don't try to fiddle with your eyebrows, that is not the way to go. Always make sure they at least align with the inner corner of your eyes. However you can extend your brows a little by filling them in.

Wide set eyes

Hooded eyes
Some people are born with them and some acquire them with age. Whatever the case, there is a 3 step method to make eyes appear brighter and the brow bone "lifted". Don't make the mistake of highlighting the brow bone to much, that will actually make the hood more prominent. Instead, highlight the inner corners of your eyes to make them pop. To help the hood recede, use your mid tone colour eye shadow. Apply it all over the lid and the brow bone. You can choose to then highlight your brow bone slightly and then blend. Contouring is the key here. Take a dark shade eyeshadow and contour your crease and the outer edge of your lash line (in a crescent shape). Curl those lashes and apply plenty of mascara.

A note for all eye shapes. Cat eyeliner suit ALL eye shapes. Its just about seeing which thickness you are comfortable with and how far to extend the flick.
I hope this post was helpful. Feel free to post a comment if you have any questions and I'll get back to you.
Stay blessed, Peace!!
Saturday, 27 October 2012
The one with the actual autumn shoot
Hello folks. Its been a while since I have posted anything, but I have been so busy!! I have been a part of some photo shoots recently, so I just wanted to share some of the shots with you.
Photographer : SmileyJST


Hope you liked the pictures. There's plenty more where that came from!! I'll keep you posted.
Stay blessed. Peace!!
Photographer : SmileyJST


Hope you liked the pictures. There's plenty more where that came from!! I'll keep you posted.
Stay blessed. Peace!!
Subscribe to:
Comments (Atom)