Tuesday, 18 December 2012

Tis the season to get smokey

Xmas is drawing near, and I am sure most of you have attended at least one Xmas party. One of my most favourite and glamorous looks for parties are smokey eyes (followed closely by the 'Red Lip' look.) 

There is just something so glamorous and alluring about a smokey eye. It can be played down with neutral colours or you can go all out wearing bold eyes and lips, the choice is yours. 

I treated myself to some retail therapy a few days ago, and was kindly given some complimentary makeup, courtesy of No.7 at Boots. 


As soon as I opened the 'Deco Darling' gift box, I knew these products were perfect for a smokey eye look. I thought I would share how you can make good use of these products too. 

The kit contained:

  • Exceptional Definition Mascara in "Black"
  • Stay Perfect Lipstick in "Classic Rose"
  • Stay Perfect Eyeshadow in "Black Gold"
  • Stay Perfect Metallic Eyes Pencil in "Blackest"


Get The Look


Unfortunately, the box did not contain a foundation base, so I had to provide my own. 

  1. I started by prepping my skin with a moisturiser and a primer. I used 'The Body Shop's Seaweed mattifying day cream' and 'Collection 2000 Primed and Ready' primer. 
  2. I applied my foundation on all the necessary areas with a foundation brush. Matte skin is best for this look, so I used 'Chanel Perfection Lumiere in 50 Beige'
  3. I started on the eyes by applying the metallic eyes pencil along my top lash line. I made a very thick line from the inner corners to the outer corner. 
  4. Then I took a blending brush and used the Stay Perfect eyeshadow to blend the eyeliner. I started on the outer corner of the eyes and blended inwards to get the gradient effect. You can build the colour however much you want.
  5. I applied the Metallic Eyes liner again, this time concentrating on keeping the line closer to the lash line (upper and lower lash line.) I used the blending brush to blend the liner again, but this time I didn't use the eyeshadow. 
  6. Finish the look by applying two coats of the Intense Volume Mascara. Let the first coat dry before you apply the second coat. You can also opt to use false lashes to add drama.
  7. I wiped away any fallout under the eye, then used concealer to brighten the under eye. 
  8. Contouring is a must for this look, especially if you are planning on taking pictures. You want to avoid a flat face. I used 'Victoria Jackson bronzing powder' to contour my cheeks. You may use a peach or light pink blush to add colour to your face. 
  9. Last but not least apply the Stay Perfect Lipstick onto your lips. Blot your lips with tissue and reapply for a longer wear. 


I have quite a hooded lid, so I didn't take the colour beyond the crease. However you can adapt the look to suit you. If you feel scared to put the colour all over the lid, you can smoke out the liner without apply the eyeshadow all over the lid. 

Hope you like the look, and Good Luck!! 

Stay blessed, Peace!

"Makeup is for now, but beauty is forever"

Friday, 7 December 2012

Back to Basics - Makeup to suit your eye shape

I have received a request to write a post on how to create eye makeup to suit your eye shape. So here it is. What I love about makeup is that you can use colours and textures it to manipulate all sorts of looks and shapes. Eyes can be enlarged, made smaller, emphasised or defined just by makeup. All you need to do is know how. 

There are 6 main types of eye shapes. I will talk about how to "correct" each eye shape with makeup. To be honest I don't like using the word correcting, but I mean generally if you want to know how to apply makeup in a way to suit them then keep reading. 

Almond eyes 

This eye shape is considered to be the "perfect" eye shape, as most styles of makeup will suit this eye shape. Go crazy and experiment with different colours and styles of shading and highlighting. 


Down turned eyes 

This is where the outer corner of the eyes droop down slightly, almost giving the eyes a sad look. A technique to "lift" the eyes is by shading up and out, almost drawing yourself a lifted eye. You want to apply liner close to the lash line and you want to fill the outer 2/3 of your eye socket with a dark shade. This will lift the eye. Curl your lashes and apply mascara to really open them up. 


Prominent eyes

Also known as bulging eyes, you would think that by adding very dark colours you are receding you eyes. Incorrect!! By going to dark with eyeshadow, its going to look obvious. Its actually best to stick with neutrals and nude colours. If you want to use bright colours then apply it on the lower lash line to add a pop of colour. This also helps to shift the focus away from the lids. Another tip is to use false lashes rather than eyeliner, as that will set the eye back a little. 


Closed set eyes


The key thing to do here is to highlight the inner corners and shade only the outer corners (1/3 of the eye). You want to make the gap between your eyes look bigger, and you want to take the emphasis off the shorter distance. Please don't try to fiddle with your eyebrows, that is not the way to go. Always make sure they at least align with the inner corner of your eyes. However you can extend your brows a little by filling them in.


Wide set eyes

As you probably have guessed, doing the reverse for what is advised for closed set eyes is appropriate for wide set eyes. To bring eyes closer together, you should emphasize the inner corners by using darker colors in the inner corners. Apply lighter eyeshadow to the outer two-thirds of the lid. You can use eyeliner on both the top and the bottom lashline. Pencil eyebrows a little closer to the nose but don't extend eyebrows out at the ends. 


Hooded eyes 

Some people are born with them and some acquire them with age. Whatever the case, there is a 3 step method to make eyes appear brighter and the brow bone "lifted". Don't make the mistake of highlighting the brow bone to much, that will actually make the hood more prominent. Instead, highlight the inner corners of your eyes to make them pop. To help the hood recede, use your mid tone colour eye shadow. Apply it all over the lid and the brow bone. You can choose to then highlight your brow bone slightly and then blend. Contouring is the key here. Take a dark shade eyeshadow and contour your crease and the outer edge of your lash line (in a crescent shape). Curl those lashes and apply plenty of mascara. 


A note for all eye shapes. Cat eyeliner suit ALL eye shapes. Its just about seeing which thickness you are comfortable with and how far to extend the flick. 

I hope this post was helpful. Feel free to post a comment if you have any questions and I'll get back to you. 

Stay blessed, Peace!!


Saturday, 27 October 2012

The one with the actual autumn shoot

Hello folks. Its been a while since I have posted anything, but I have been so busy!! I have been a part of some photo shoots recently, so I just wanted to share some of the shots with you.

Photographer : SmileyJST


Hope you liked the pictures. There's plenty more where that came from!! I'll keep you posted.

Stay blessed. Peace!!

Wednesday, 17 October 2012

The one with the autumn shoot

I have talked about autumn trends in makeup, but I really wanted to showcase that in a photoshoot. I organised a test shoot to explore ideas and see how the makeup looks in natural lighting. I decided I will have a go at modelling, although I found out its not as easy as it looks. I think I'll just stick working on the model rather than as one!! The makeup was a very light eye with heavy eyeliner and a maroon lip(although in the pics it looks red). Here are a handful of shots the photographer and I chose. 


The last shot is my favourite! I hope you liked the pictures, I certainly enjoyed being in front of the camera. I actually went ahead with the autumn shoot and I am so excited to show you what we achieved. I will post the pics soon. Check out my Facebook page for more updates.

Stay blessed. Peace!

Saturday, 13 October 2012

Back to basics - Makeup to suit your skin type

I have previously talked about recognising your skin type and tailoring your skincare to your skin type. But did you know you can also do the same for your makeup? In this post I will be talking about the different types of makeup you can use to you advantage, which can help you achieve the look you want. Its just about making the right choice. 

Oily Skin 

So you think you can't wear foundation because your skin is too oily? You are wrong!! The key to choosing the right foundation is a) the ingredients and b) the formulation. As a former oily skinner, liquid foundations did not work well with my skin. However, the problem was that I was not buying oil free formulations. Back then oil free foundations were just starting out, but now numerous makeup brands offer oil free foundations. Still don't like the idea of a liquid foundation? What about a mousse? Mousse foundations are a good alternative to liquid foundations as they provide the coverage you require without the oily sheen on the face. You probably think I am going to mention powder foundation too, but you are wrong. Personally I have never been a fan of powder foundation, but I do definitely recommend them for touch ups or to set your makeup. Moisturise your face before you apply anything but opt for a mattifying gel moisturiser. Don't forget to Prime Prime Prime your face and lids. It also helps to carry blotting paper around with you (or very thin tissues). Kleenex have now got their own blotting tissues, and let me tell you they work a treat!


Dry Skin 

With dry skin I would do the complete opposite of what I said for oily skin. Well not everything. Just don't use mousse foundations as they will look flaky on your skin. I would definitely advise you to use a primer as it helps to alter the skin's texture, making it smoother and prepped for applying foundation. Even though you do not need to look for oil free formulations, you should still consider the texture of your foundation. Tinted moisturisers that give a medium coverage are great for dry skin. Everyone is talking about BB creams and with many available of the market, why would you not use a beauty balm cream that acts as a foundation while looking after the skin? 

Try to avoid cream blushers. When you apply thick textured makeup on the skin, it will buff your skin making it look even more flaky. Instead stick to a powder blush. Its much softer and you can build up the colour. 


Normal Skin

Well you have got it lucky. I would still test out any new products you are considering to purchase, in case you are allergic or you don't like how they feel on your skin. But there is no rule of thumb for you, go crazy and experiment!!! 

Hope this post helped, plenty more where that came from. 

Stay blessed. Peace!

Friday, 12 October 2012

The one with the autumn/fall trends

The weather is getting chilly, the leaves are falling and its time to pull out the cardigans. Autumn is here, and its not like me to not talk about autumn makeup trends. I have never been a trendsetter or a follower for that matter, and I believe you can wear whatever you like and paint your face however you want to. But there is just something so nice about matching your makeup to the season. 

So when you think of autumn, you think of earthy browns, plums and neutrals. Well you are correct!! Autumn 2012 is no different to previous trends. If you look at previous years, trends within makeup and fashion tend to make a come back. Here are some things you can try to bring autumn into your makeup bag. 


Mulberry lips 

Mulberry, crimson, burgundy, dark plums. This almost gothic look resemble that "just bitten" or "I have had too much vino" look. These colours will look great on all skin colours, and thats what I love about an autumn lip. Wear your strong lip alone during the day, with just a slick of mascara and soft brows, or you can go all out and smoke out your eyes with different shades of brown for an evening look. If you are afraid of the colour, then use the lipstick as a lip stain. Apply lip balm on your lips then lightly dab on some lipstick and blend. Because its an autumn trend, you don't need to splash out on a designer lipstick. Many chemist brands offer this shade, such as revlon in "black cherry". 


Metallic Eyes

This is such a beautiful look. It is so easy to add a bit of metal to your daily makeup look. Wether its gold, silver or even blue, metallic shadows look great on everyone. Either use the metallic shadows all over your lids, or metallic eyeliner, or even just to highlight the inner corners of your eyes. My absolute favourite metallics at the moment are the Maybelline colour tattoo 24 hour eyeshadow creams. I know what you are thinking, creams? They work well, even on my oily eyelids. The colours are so pigmented and last so long. I have "on and on bronze" and "immortal charcoal". 


Flushed Cheeks 

Summer was all about bronzed faces. But now the english rose look is making its come back. That colour your cheeks become when you are out in the cold for too long. To be honest, flushed cheeks were never off trend, but I think the focus is more on the pigmenting medium!! Powder, gel or cream? Wether its a red stain, a rosy powder or a neon pink blush, it may look scary but when worn correctly it can look great.  My preference is cream blush, as it gives an even colour which can be worn under your face powder for a natural look. I love the MAC cream blushers, but if you are looking for something a bit cheaper then there is no harm in using drugstore blushes. Always test your products before you buy, especially cream formulations. 


Moss Green 

Moss green its making its way through the fashion industry, and its making its mark in the makeup world. I recommend green eyeshadows with gold specs, especially for brown and hazel eyes, as it brings out the colour of your eyes. For blue eyes I recommend darker moss colours, almost a charcoal green. 


I hope you enjoyed reading my lengthy post and get to try out these looks. Good luck.

Stay blessed. Peace!!

Friday, 5 October 2012

The one with the body shop goodies

Hey folks! This week has also been busy, but I am back with loads to talk about. In this post I'll be talking about my favourite items from "The Body Shop", mainly focussing on the bath, skincare and scents.

Those of you who are not aware of The Body Shop, they are a well established beauty brand that specialise in fair-trade and animal cruelty free products. You can find bath, body, skincare, makeup and other beauty related accessories. For those that do not have access to a store, you can order online. 


 Here are a pick of my favourite products and why I love them so much. 


So my first pick is the "fuzzy peach" and "raspberry ripple" bath and shower gels. I just finished a 250ml bottle of the raspberry ripple. These shower gels are so scrumptious!! The scent lasts a whole day (if I don't perspire too much). I don't need to use a lot when I shower, and I feel squeaky clean after. I can't say how long a bottle will last you as I use multiple shower gels. At £4.00 per bottle, these are definitely a great buy because they do the job well!


One scent I discovered a few days ago is the mango selection. Mango scented body butters, shower gels, soap and body mists. I used to own the mango body butter, but I was not a fan of the scent back then, and so that put me off the mango smelling products The Body Shop sell. However, I'm not sure if my scent palette has acquired mango, or they have changed the scent, but I am absolutely in love with the mango range. I decided to purchase the mango shower gel and body mist, as layering your scents helps to make it last longer.  The mango body mist is surprisingly concentrated and has good staying power. The mist comes in a glass bottle, rather than the conventional plastic. It gives the product a more luxurious feel, which I like, The downside is that I would be wary to keep it in my handbag incase it decides to shatter! I definitely recommend that you check out the body mist range, as there are numerous scents to choose from. 


Why is it that your favourite items become discontinued or go on sale and tend to not make an appearance when you need them to? That is what has happened with my "raspberry ripple" shower gel and the "lychee blossom" scented products. Lychee blossom is a very sweet scent, with floral undertones. If you are into your sweet scents you will love this. I purchased the body mist, body lotion and perfume. I love to layer my scents for staying power. I can't seem to find these in store at the moment but I am keeping an eye out for them. The same goes for the my "Neroli Jasmine" scent. 


The Neroli Jasmin perfume was a gift, but I really love this fragrance as its a very elegant scent. I visited the store and searched online for it, but alas I could not find it. I was told that it should make a comeback soon, fingers crossed. I decided to purchase the "Japanese Cherry blossom" perfume. Even though it is quite sweet and florally, it has clean and fresh base notes, which means the scent is not too loud. 

Those are my favourite body shop scented products. What's your favourite and why? Let me know. 


Stay blessed. Peace!


Monday, 1 October 2012

The one with the interview mis-haps

Bonjour my fellow beauties. Hope you are well. Yes I'm throwing out post by post but I just have so much to talk about. I must admit, blogging has been quite therapeutic. I'm here to talk to you about how to give off the best impression when being interviewed. 

Unemployment can be emotionally and financially draining. We have all been there at one point or another, and with the current economic recession finding work is like a battlefield. Ever get frustrated and feel like job searching is a never ending process? I tried researching some articles to see if your looks can play a part in the hiring process, regardless of your qualifications and suitability for the role. Here is what I found:-

Keep sweat at bay 

Nerves sometimes do get the better of us, but there is nothing more off putting than an unpleasant odour and the appearance of sweat (unless Snoop Dogg is interviewing you). We obviously can't help our feelings and hormones, but a good shower and some deodorant should do the trick. Keep a handkerchief handy so you can mop up before you enter the interviewing room or you can use tissue. Blot the tissue, don't wipe, or you will find bits of tissue on your face.


Pay attention to the little things

Employers will look for anything that could be a deal breaker. That includes chipped, dirty nails and runny mascara. These mistakes send messages that indicate that you do not care for presentation or attention to detail, or that you do not think two steps ahead. Crazy I know, but hiring someone is not an easy choice, so employers will look for anything to weigh you up against your competitors. If you do want to paint your nails, then paint them in a clear coat or a soft pink. That way if your nails do chip, its less obvious.

Professionalism is essential 

I'm not just talking about clothes. Yes, dress smart and show them interviewer than you mean business. However, sometimes you might become too friendly and get carried away with the conversation. Remember that the interviewer is not your friend, so don't ask your pregnant interviewer if she is planning to breastfeed her baby or give the interviewer  a hug as you leave!

Be minimalistic 

Don't overdo your accessories and makeup. Keep makeup neutral and pretty, and keep chunky accessories at home. Stick to maybe one statement piece. I would avoid large rings, especially if you talk with your hands as it can be very distracting. You want the interviewer to focus on what you are saying, rather than what you are wearing. 


Confidence - fake it 

If you are feeling confident, then great!! But if you aren't, then try your best not to show it. A key giveaway is posture. I know its sounds simple but posture can indicate your confidence levels. Try your best to sit up straight and look at the interviewer. Looking at them will give the impression that you are making eye contact, even though your not as comfortable. It will make such a difference, trust me! 

Hope these these tips helped. Good luck :)

Stay blessed. Peace!!!


Sunday, 30 September 2012

The one with the eyeshadow dupes

I have some good news... for those of you that already own a "NAKED" and "NAKED 2" palette by Urban Decay, may not find this post as useful as those who don't. Nonetheless this post is still informative!! 


So the Naked palettes by Urban Decay are very popular in the makeup world, and are said to be essentials in a girls makeup bag. I can certainly see why, as the eyeshadows are great to work with, blend very well and look very pretty. But at £36 per palette, it certainly does break the bank for some. You can look at it this way, each eyeshadow is costing £3 and is of very good quality. Plus mine came with a "shadow karma brush" and the infamous urban decay primer potion. Although I do feel that they are an investment, I managed to stumble across an alternative. 

Here in the UK, we have a drugstore brand known as Make Up Academy or "MUA". MUA is delivers great quality products at a very low cost price. They have created many eyeshadow palettes, each with their own theme. I couldn't help but notice how similar two of their palettes were to the Naked palettes. 


The MUA palette is called "undressed" and is a dupe of the NAKED pallete. Undressed...Naked... Co-incidence? 
The second palette by MUA is the Heaven and Earth Palette, which is a dupe of the NAKED 2 palette.

At only £4.00 per palette, I think its the best dupe and best value for money. You do not need to justify buying these palette. Although there is a significant difference in price, I certainly think MUA have done well to imitate the NAKED palettes. 

Overall I think both palettes are brilliant. The NAKED palettes are definitely your "splurge" eyeshadows but you are definitely getting the quality you pay for as they are super pigmented and very silky when applying. The MUA palettes are not that far off, I would say around an 85% match, with some shades varying slightly and do not contain some glitters like the NAKED palette. 

Let me know your thoughts on both brands. 

Stay blessed. Peace!

Saturday, 29 September 2012

The one with the haul

Good evening folks!! Hope you are all well. Today I have decided to do a haul. For those of you who don't know what that means, a haul just talks about things that I have purchased. Today was my shopping day, and I bought a whole bunch of stuff which I will share with you. It might sound a little materialistic, talking about what I have bought, but the reason I want to share my buys with you is so that you may benefit from my good or bad choices!! So let's begin. 

My recent purchases

So the first thing I bought, was a flat ended bronzing brush by QVS. QVS is not a well known brand here in the UK, but I absolutely love their brushes. They are very good quality at bargain prices. I also use their concealer brush, and swear by it as its the best concealer brush I have ever used. The concealer brush is soft yet firm and holds my concealer well. Anyway back to the bronzing brush!! It is flat ended, which is great for contouring those cheeks, and I would also use it to highlight my cheekbones. The good thing about this brush is that it is soft enough to use as a fan brush, to blend everything together. I definitely recommend this brush. 


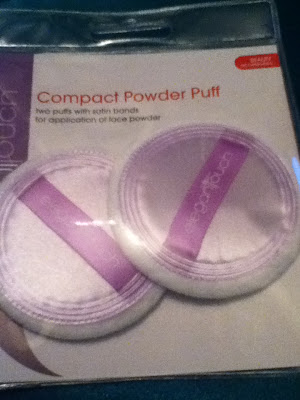
The second item I bought was the compact powder puff by elegant touch. Its nothing special, but what I like about these powder puffs is that they come with satin bands, making the application of powder much easier. I would use these powder puffs when using powder to set foundation. If you want to mattify your face with powder then you can go ahead and use a powder brush. 


Keeping with the makeup application tools, I searched a lot for a good quality yet value for money stippling brush. I finally came across Samantha Chapman's "Real Techniques" stippling brush. I have heard raving reviews about the Real Techniques brushes, so I thought I would give the stippling brush a try. Let me tell you, it certainly is not overrated. The brush is so soft and dense, making it very easy to buff in the foundation. I certainly would look into buying more Real Techniques brushes as they are a good investment.

One of the most understated drugstore brands, in my opinion is Collection 2000. Today I purchased the concealer and sheer loose powder. I won't talk too much about them as I want to talk about all my Collection 2000 products in another post.

Last but not least, I needed a new moisturiser. Until now I had been using Clinique's "dramatically different moisturising gel" for oily skin. My skin used to be very oil, but within the past 2 years it has become combination-normal, and so my cheeks are much drier. My current moisturiser was not doing anything for my skin, as this oil free gel was not strong enough. I decided to turn to The Body Shop for my moisturising needs. I was recommended to use the "seaweed mattifying day cream" for combination skin. This cream claims to mattify the oily areas while moisturising the dry areas of my face. The scent is not overpowering, and when I applied the cream to my face it certainly did feel much softer. I will let you all know how I got on in 2 weeks.


I hope this haul was helpful. Stay posted for more of my best buys. 

Stay blessed. Peace!


Friday, 28 September 2012

Back to basics - Skin care routine

So hopefully you now know what your skin type is. If not, have a look at my previous post "back to basics- know your skin type" to determine your skin type. You may hear a lot about the 3 step "cleanse, tone and moisturise" routine, but to be honest skincare is not that simple, and the 3 step process may not be suitable for everyone.


Normal - Combination Skin

The most common skin type, that has a slightly oily t-zone but with normal (non oily) cheek areas. This exhibits good circulation and healthy colour. You may find that some products may be more effective in different areas of your face, so I would suggest treating your t-zone differently to the rest of your face. I recommend using an astringent agent on your t-zone, especially if you are prone to breaking out in those areas. Tea tree products work great for me. I would also recommend using a heavier moisturiser on your cheeks, as those areas are lacking moisture. Overall, exfoliating your skin once a week will also prevent your skin from looking dull. I regularly steam my face and it works wonders.


Oily Skin

The skin in general is quite shiny, especially in the t-zone area. The great thing about oily skin is that the excess sebum that is produced helps the skin to age better, helping fewer wrinkles to form as the oils keep the skin plump (its like natures own anti ageing moisturiser). However, the skin may be prone to spots, as the excess sebum may trap dust and bacteria from the environment, which may clog your pores. The oil itself does not cause acne. Try using a facial cleanser (or face wash) that is designed for oily skin. You are looking for ingredients such as salicylic acid, tea tree or witch hazel.

Do not make the mistake of avoid moisturising your skin because it is oily. Use an oil free moisturiser as this will hydrate the skin but without the oil. I also recommend exfoliating the skin, to unclog pores and get rid of dead skin cells.


Dry Skin

The can get quite flaky, red and patchy as well as prone to fine wrinkles. Dry skin is more common with older women, as fluctuating hormones bring about this change. In women of colour, the skin may appear ashy and dull.

Dry skin can be tricky and requires extra special care. Use heavy moisturisers during the day and topical aqueous creams before you sleep. You do not need to worry about heavy moisturisers giving you breakouts. I would still recommend exfoliating, but with a much gentler exfoliator (micro beads). Avoid astringent agents as that will make the skin worse. 

For those who have sensitive skin, I would say to avoid products that are heavily scented and use products that are specially designed for sensitive skin. 10 years ago, there weren't many products on the market that could be used on sensitive skin but nowadays even drugstore products have their own sensitive skin range. 


Other tips

Avoid sun damage. Try and always wear spf, even if you live in sunny england!! You might not see the effects of sun damage now, but it will definitely catch up with you when you get older. Preserve your youth. 

Even if you do not wear much makeup, do not go to bed without cleansing your face. All the dirt and product buildup from the day will sit on your face overnight. If you don't have the energy to cleanse with a face wash then use some gentle wipes.

As well as looking after your skin from the outside, I cannot stress how important it is for your to stay hydrated from the inside!! Drink as much water as you can to flush out toxins through your system. Some gentle exercise also contributes to glowing skin. Trust me I am talking from experience!!

I hope this post helped. Feel free to leave comments asking any particular questions you may have. Good luck. 

Stay blessed. Peace!